Classroom Courses

Classroom courses are used to host in-person or virtual sessions. All Classroom sessions must be graded once they have ended.
Use the tabs below for assistance in managing a Classroom course.

​​​​​​​​​​​​​​​​​​​​​​​​​​​​​​

A new Classroom course request must be submitted through the LearningHub Ticketing system. Once your ticket has been responded to by LearningHubAdmin, you will be provided the Classroom course shell along with additional instruction. 

  1. Contact Service Desk
  2. Select New Course Request 
  3. Select Classroom in the Format Field
  4. Complete all Mandatory Fields
    *Note: Please ensure you select the correct Health Authority the course should be created for.New Course Request - classroom.png
  5. Click Submit
  6. The LearningHub Support Desk will email you once the course has been created or will contact you if they have additional questions.

Once you receive your LearningHub course shell, please review the course settings.​

For Classroom Courses, complete the following steps.

1. Login to your account

2. Click Admin Dashboard

Admin.png 

3. Select Courses

4. Select the Course

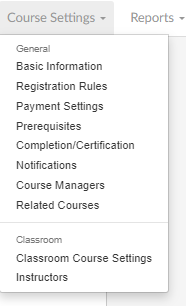
5. Select the Course Settings dropdownClsaf.png2017-07-10_14-46-43.png

6. Go to the Basic Information tab and fill out all the necessary information, including the Course Description, course contact, Target Audience, etc.. 

Course Branding
 allows you to choose the health authority that best represents the course. 

course branding 2018-03-08_16-45-26.png

7. Go to Registration Rules

8. As the course is still in the development phase, check that the Course Visibility is set to either Accessible via private link only or Disable Self Registration. This is so that the course can be created and tested before being accessible to learners.Course vVis.png

9. Additional Registration restrictions can be added under Registration Options. This includes adding a passcode or restricting the course to verified employee accounts.

Pass.png

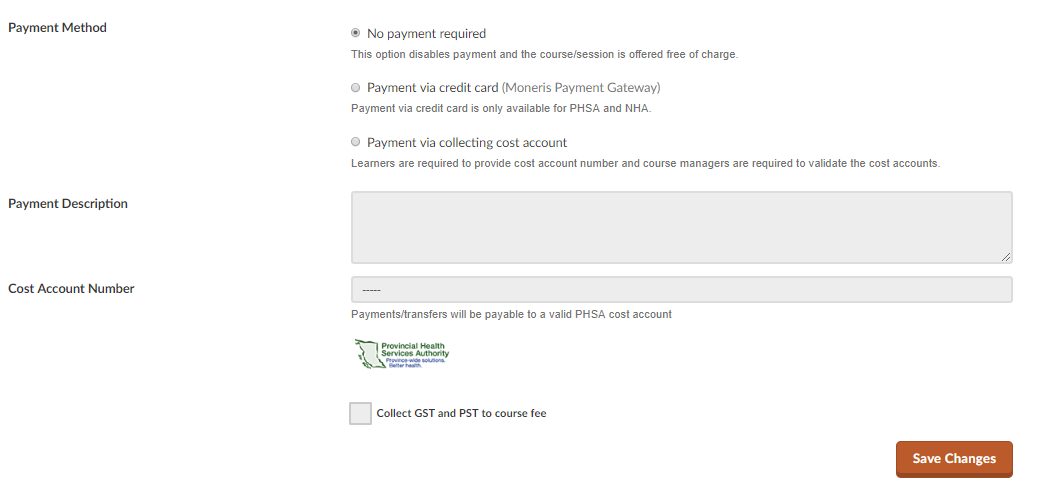
10. Set Payment Settings, if required, with a valid Cost Account Number for your Health Authority.
*Only PHSA and NHA Courses are able to use Credit Card payment.
Payment.png

11. Set Course Prerequisite Settings if required

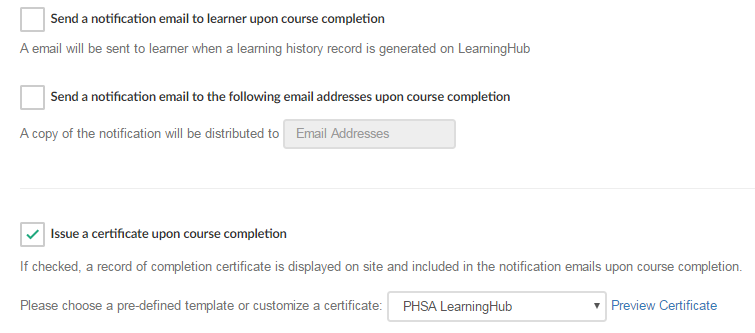
12. Select the Course Completion and Certification options to your preference. Courses that require Recertification should be filled in.Cert.png
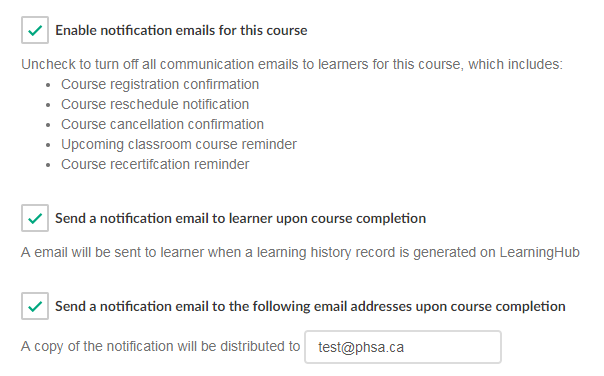
13. Click Notifications and check whether you would like to enable notifications for this course. 
notification 2018-03-08_16-33-19.png

14. Click Add Course Managers in Course Managers sectiondsafdf.png

15. Click Related Courses to view if your course is listed in a Curriculum.

16. For Classroom Courses, click Classroom Course Settingsseraw.png

Set the Waiting List settings and Adjust the Seat Limits if required
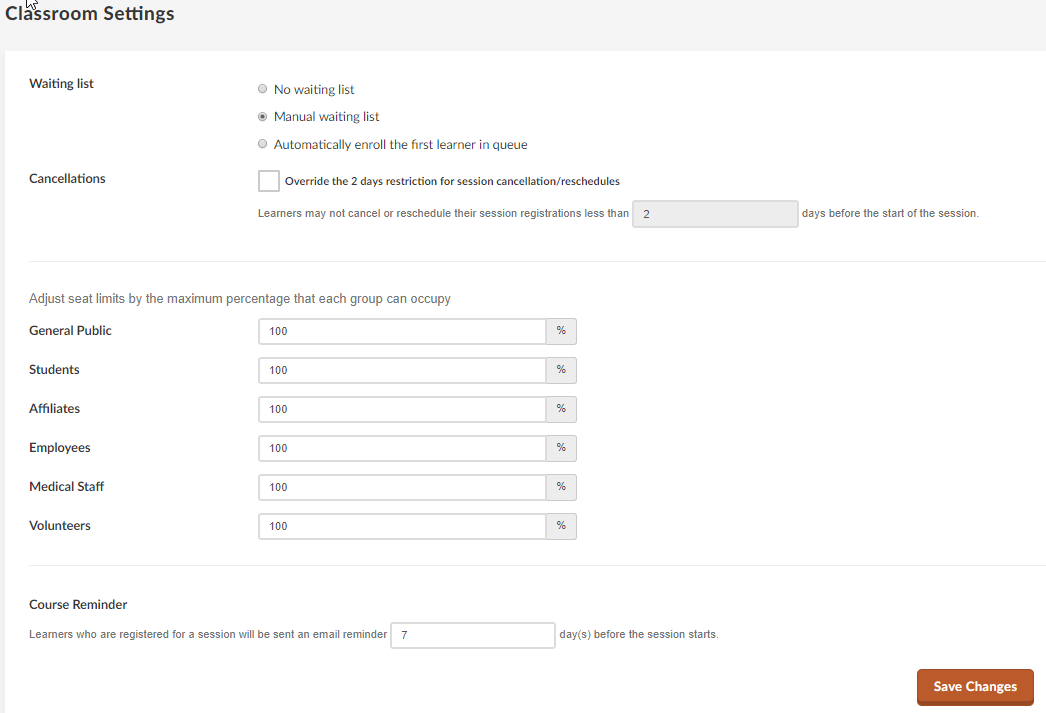
Seat.png

Note* Adjusting the seat limits distributes the maximum number of seats for each group type.

18. You can view the Instructors you have added to your sessions under the Instructors tab. Here, you can also view all the sessions under a specific Instructor. 
As a Course Owner/Manager, you can add Course Managers to your course who will also have access to edit the course settings. 

1. Click Admin Dashboard

2. Click Courses

3. Select the specific Course from Manage Coursescorps.png

4. Click the Course SettingsCourse Settings.png

5. Click Course Managers

CourseManagersTab.png

6. Click Add Course ManagerAdd Course Manager.png

7. Enter the name or email of the user. You can also filter by First Name, Last Name, Email, and group on the left side.

add ppl2018-03-09_14-30-55.png

 You can choose multiple users to be added at once.

8. Click Add Course Manager

Adding Instructors to a Session

Instructors will only have access to the sessions that they are listed as an Instructor under.

To add Instructors to an existing course session, you will need to Edit the Session

1. To edit a session you have created, select the session, and on the right side of the page, go to "Update Session" > "Edit Session".

editsession3.PNG
2. Then, under the Instructors field, locate and select the user. Then, Save Changes.

AddInstructor1.png


Course Managers who need to view a report on all the learners who have registered, completed or have cancelled their course can use the Reports function to track this data.  

To access Reports for a course that you manage, follow these steps:

1. Login to your account
2. Click Admin Dashboard

3. Click Courses and select the course that you are wanting to view a report of

4. Click the Reports tabREportss.png

5. Filter the report by date and time, and then, click Filter Report
ClassroomCourseReportGenerate.png
6. Click Download Session Report for a general report of the sessions. Click Download Cumulative Report for an extensive report that includes learner information. 
After receiving the LearningHub​​ Classroom course shell, you may start to create your session(s).
  1. Login to your account
  2. Click Admin Dashboard
  3. Click Courses
  4. Select the specific course
  5. Click Create New Session at the bottom of the page or the "+" symbol ​
    CreateSession.png

  6. Enter the Session Name, Location, Webinar Link (if it is a virtual session), Start and End date, Max Participants (roster size), Instructors and Visibility

    CreateSession2.png

  7. Click Save Changes
Note* Instructors only have the ability to view the sessions that they have been added to.

For Classroom courses that contain several sessions, you can search for the session title in the Search bar next to the magnifying glass.​ You can also search using the date range filter. 

SearchSessions.png


  8. To edit a session you have created, select the session, and on the ​right side of the page, go to "Update Session" > "Edit Session".
editsession.PNG

If a Classroom session needs to be cancelled or was created in error, you will be able to remove the session, barring no learners are still registered in the session.

  1. Login to your account
  2. Click Admin Dashboard
  3. Click Courses

  4. Select the specific course
  5. Select the Session you wish to delete
  6. Sessions cannot be removed if there are Learners registered.
    a.) We first recommend emailing the Learners about the cancellation. This can be done by selecting "Email Learners" and then "Copy" the list. Please then paste what you have copied into a new email.
    emailearners.png

    b.) After informing the Learners, please select the learners in the session and select "Reject/Cancel". You will then need to provide a comment about the change (i.e. "Session Postponed").
     
    emailearners2.png

  7. Under Manage Session, select Edit Session

    DeleteSession.png

  8. Remove the session OR Hide/Disable the session 
    DeleteSession2.png

 
  1. Login to your account
  2. Click Admin Dashboard
  3. Click Courses
  4. Select the specific course
  5. Select the Session you wish to edit
  6. Click Update Session and select Edit SessionEdit Classroom Session.png
  7. Edit the details within the session

Course Managers can register learners into a session themselves. If your Classroom session requires credit card payment, manually registering a learner into a session will bypass the payment section of registration.

  1. Login to your account
  2. Click Admin Dashboard
  3. Click Courses
  4. Select the specific course
  5. Select the Session 
  6. Click Register Learner
    Register.Learner.png
  7. Enter the name or email of the learner, select Search, select the user, and then click on Register LearnerClick Search.png

More than one learner can be added at once into the session. The learners added will be shown on the right side. Once you are finished adding the learners, select Register Learner.

bulkenroll.jpg

Note* If you cannot register a learner into a session, the learner is already registered into a session in the course. Learners cannot be registered into multiple sessions in a course.
In this case, locate which session the learner is registered under. If it is an upcoming session, reject them from the session. If it is a past session, you will need to update their completion status or reject them if no grade is applicable. 

  1. Login to your account
  2. Click Admin Dashboard
  3. Click Courses
  4. Select the specific course
  5. Select the Session 
  6. Select Reject beside the learner you wish to remove next to their registration record. You will prompted to add a remark for this action. 
    Reject.Learner.png
    Or, select the registration record and then select "Reject/Cancel"
    rejectlearnerpast.PNGTo reject multiple learners, select the box beside each learner and then select "Reject/Cancel" at the top beside the search bar. 
    RejectMultiple.png

If an ungraded learner needs to be removed from a past session, follow the same instructions above. 

If you need to remove a graded learner from a session, submit a Course Management Support ticket.

  1. Login to your account
  2. Click Admin Dashboard
  3. Click Courses
  4. Select the specific course
  5. Select the Session 
  6. To reschedule a learner, select the learner and Click Reschedule. You will then be able to select a new session to move the learner into. 
    Reschedule.Learner.png
  7. Select To Roster beside the session you wish to move the learner into. Reschedule.Learner21.png
  8. To reschedule the learner into another session's waitlist, click the To Waiting list button next to the session.

Move a User to/from Waiting List
  1. Login to your account
  2. Click Admin Dashboard
  3. Click Courses
  4. Select the specific course
  5. Select the Session 
  6. Select the box beside the learner record and select Move to waitlist Waitlist.png
The learner now appears on the waiting list.

To move a learner from the Waitlist to a session, locate the learner under the Waitlisted tab and select "Register to session".
  1. Click on the Waitlisted tab
  2. Select the Learner
  3. Click Register to sessionWaitlisted 2.png

If you are reviewing the completion of a learner, you will be able to view all the items that user or another Course Manager/Instructor may have done to the Learners registration under Status Transitions.​

1. In the Classroom Session, click on a Learner

2. A side window will appear on the right hand side of the screen.

3. Scroll to the Status Transitions to view all records of the Learner while enrolled in the session.

2019-06-11_15-12-52.png
The status "Registered" under a session that has already occurred will be listed as "Pending" under the learner's Learning History. If this is the case for a learner, please​ grade the learner as all sessions need to be fully graded.


Course Managers may wish to send notifications via email to users registered in a particular session.  

  1. Login to your account
  2. Click Admin Dashboard
  3. Click Courses
  4. Select the specific course
  5. Select the Session 
  6. Click Email LearnersEmail Learners.png
  7. Enter the message that you intend to send
  8. Click Email Learners
  9. If you need to attached any additional information or documents, press the Compose Email button to open the email in your preferred email client.
sfsdf.jpg


‎Print a Sign In sheet for your Classroom session to track attendance and marks for each session. Attendance sheets will contain a Learners Full Name and Preferred Name if they have entered it into their profile.

  1. Login to your account
  2. Click Admin Dashboard
  3. Click Courses
  4. Select the specific course
  5. Select the Session 
  6. Click Download Forms and select Sign-in Sheet from the dropdown menuSignin.png
  7. Click Print PageSign2.png


As a Course Manager or Instructor of a Classroom course, you must ensure that grades are updated for each session immediately after the session has ended. You will be grading learners using the Gradebook feature. 

*** It is the Course Manager and/or Instructor's responsibility to update course grades and attendance. You should never be leaving sessions as ungraded as the learner's record under their Learning History will be listed as "Pending", and they will not be able to register into any future sessions within the course, if needed. 
  1. Login to your account
  2. Click Admin Dashboard
  3. Click Courses
  4. Select the specific course
  5. Under Manage Learners, select Pending to be view the sessions that have occurred and are ready to be graded.
    Pending.Tab.png

  6. Select the session that you need to grade. Sessions that have not been fully graded will be labelled in red as "Grading Required".
  7. Select "Open Gradebook" to begin grading the learners in the session.
    *Note: If any learners need to be removed from the session, remove them before you begin grading as you will not be able to remove a graded learner. 

    Information on how to use the Gradebook feature can be found by selecting "Gradebook Guide" under the session or by visiting the helpsite. 
    Grade.Learners.png
  8. After you have graded all learners in a session, select "Complete Session" to move the session to the "Completed" tab. 
    Complete.Session.png
To grade or update the grade of learners of a session under the Completed tab, the session will need to be moved to the Pending tab for grading. 

To move a session to the Pending tab, locate the session under the Completed tab and select "Manage Session" > "Move to Pending".

MoveSessiontoPending.png

To grade/re-grade the learner(s), re-open the gradebook by selecting  "Manage Session" > "Open Gradebook". 

OpenGradebook.Changegrade.png

Once all learners have​ been graded and the changes have been made, select "Complete Session" to move the session back to the Completed tab.