e-Learning Course Settings

Course Owners/Managers are responsible for uploading and maintaining their course content. Please review the information below on course development and then proceed to Course Testing.

​​​​​​​​​​​​​​​​​​​​


When you receive confirmation that your course has been created by the LearningHub Support Desk, you will receive two course shells - the LearningHub course shell and the Moodle course shell

Your course shell will be listed as InDevelopment. Once you are ready for your course to be reviewed by us, please let us know. We will ensure your course meets all of the requirements for an online course and that it is set up properly for completion tracking. ​

To view the courses you manage, please go to your Admin Dashboard.

1. Login to your account. If you have multiple profiles, select the profile the course is assigned under.​

2. Click the Admin Dashboard


3. Click Courses to view all the courses that you own or manage

Admincourses.png

4. Navigate the top panel to scroll through your list of Managed, Active, and Inactive Courses.

2018-10-22_13-01-46.jpg

5. Favourite Courses: To Favourite a course, hover over the course title until a star appears.2018-10-22_13-01-46.jpg

Click the star so it turns yellow. The course will then appear under the Favourites Tab.2018-10-22_13-03-43.jpg

The LearningHub course shell is used to manage the overall course settings, including course description and registration settings. ​

For e-Learning Courses complete the following steps.

1. Login to your account

2. Click Admin Dashboard

eLearningaccess.png

3. Click Courses

4. Select the Course

5. Click the Course Settings dropdownCSettings.png2017-07-10_14-49-30.png

6. Click Basic Information and fill out all the necessary information, including the Course Description, course contact, Target Audience, etc.. 


Course Branding allows you to choose the health authority that best represents the course. 

course branding 2018-03-08_16-45-26.png

7. Click Registration Rules

8. As the course is still in the development phase, check that the Course Visibility is set to either Accessible via private link only or Disable Self Registration. This is so that the course can be created and tested before being accessible to learners.

CourseVisibility.png

9. Additional Registration restrictions can be added under Registration Options. This includes, adding a passcode or restricting the course to verified employee accounts.

RegRules.png

10. Set Payment Settings, if required, with a valid Cost Account Number for your Health Authority.

*Only PHSA and NHA Courses are able to use Credit Card payment.

PaymentSettings.png

11. Set Course Prerequisite Settings if applicable

12. Select the Course Completion and Certification options to your preference. Courses that require Recertification should be filled in.

NotifCert.png

13. Click Notifications and check whether you would like to enable notifications for this course. 

notification 2018-03-08_16-33-19.png

14. Click Add Course Managers in Course Managers section

CMAdd.png


15. For e-Learning Courses, there is an additional section for eLearning Course Settings

*This will already be setup by the LearningHubAdmin and should not be changed.

eLearningCoureSettings.PNG

The External URL is the Moodle link the learner will be directed to after selecting "Start Course". This should be the Moodle "view" link. This link should not be communicated to learners. 
The Moodle ID Number is setup as the LearningHub Course ID.

Moodle is the online platform used by LearningHub to house e-Learning courses. The Moodle Course shell will be used to hold your course content. Learners will be directed to the Moodle shell when they select "Start Course".

Online courses should not be used as a resource page. All courses should require completion and learning evaluation.

To develop/upload course content, access the Moodle course shell by clicking Open Course under the LearningHub course shell.
OpenCourse.PNG
Once you have the Moodle course shell open, you will need to toggle Edit mode on to begin editing and creating your course.

editbutton4.1.png​​

Creating and Uploading Moodle Activities

If you are not using an e-Learning software to create your course, Moodle has built in activities that can be used, i.e. Books, Quizzes, etc. 

addnewactivity4.1.png​​

To learn about the types of activities that can be created in Moodle, please see the Moodle helpsite*.
*Note not all listed activities on this site are available on LearningHub Moodle.

Please refer to our Quick Reference Guide for E-Learning Courses for more instruction on creating and uploading modules on Moodle. 

Module and Course Completion Settings

There are two completion settings that must be reviewed.

Activity Completion Settings: Check the Module’s Activity Completion setting in Moodle to make sure it is tracking completion for each module.
Course Completion Settings: Check the Course’s Completion setting in Moodle to make sure the course is tracking all required activities

Module Activity Completion Settings
To edit a module, select the module, and click Settings on the left Administration panel:
 scormsetting4.1.png
 
Go down to Activity completion:
ActCompletion.PNG
Please make sure the following options are selected and save the settings.:
CompletionTrackingSettingss.PNG
 

Course Completion Settings
Once all of the modules have been setup for completion, you will need to setup the overall Course completion settings.

Click Course completion on the left Administration panel:

coursecompletion4.1.png

Go down to General and set Completion requirements to “Course is
complete when ALL conditions are met”:
CompltionReq.PNG 

Go down to Condition: Activity completion and select the activities that are required for course completion. This will indicate what modules need to be tracked for completion. :
ReqModules.PNG

Scroll down and Save Changes:

savebutton4.1.png


*Upon uploading/creating the course modules, provide all necessary course completion instructions in the Moodle course shell. These instructions can be added to the Topic or Module description. This includes navigation instructions, which modules are required for completion, and how modules are to be completed (view all slides, passing grade), etc.. 
As a Course Owner/Manager, you can add Course Managers to your course who will also have access to edit the course settings. 

Please first add the Course Manager to the LearningHub course shell, and then the Moodle course shell.

Adding Course Managers to LearningHub Course Shell

1. Click Admin Dashboard

2. Click Courses

3. Select the specific Course from Manage Courses


corps.png

4. Click the Course SettingsCourse Settings.png

5. Click Course Managers

a.png

6. Click Add Course ManagerAdd Course Manager.png

7. Enter the name or email of the user. You can also filter by First Name, Last Name, Email, and group on the left side.

add ppl2018-03-09_14-30-55.png

 You can choose multiple users to be added at once.8. Click Add Course Manager

Adding Course Managers to Moodle Course Shell

Only individuals with existing editing access within the Moodle course shell will be able to grant others course editing access. 

*Please note: the individual they are looking to grant access to must first be added as a Course Manager and/or registered into the course on LearningHub. The user must also have accessed the Moodle course shell already.

1. Open the Moodle course shell 

2. Turn Editing On
EditOn.PNG
3. Select the Participants tab

Here, you can select "Enroll Users"
EnrollUsers.PNG

Under this window, locate the user by name. Please note, this search field is strict and based exactly off of their name on their LearningHub account.

You can also search by email address. Please note, the email address associated with the learner on Moodle may not be the same as the login email of their LearningHub account. Moodle may identify the user with the email address that they initially created their account with. 

EnrollUsers1.PNG

Or, locate the individual using the filter options and add the Manager role to them. 

EnrollUsers2.PNG

FilterUsers2021-08-16_13-48-35.png

Under the "Roles" column, use the pencil editing icon to view the drop menu to add the Teacher or Manager role. Then, select the save icon:
AddTeacherManager2021-08-16_13-40-16.png

Course Managers who need to view a report on all the learners who have registered, completed or have cancelled this course can use the report function to track this data.

To access Reports for a course that you manage, follow these steps:

1. Login to your account

2. Click Admin Dashboard


3. Click Courses and select the course that you are wanting to view a report of

4. Click the Reports tabREportss.png

5. Select the appropriate completion status filters and date range, and click Filter Report
OnlineCourseReport.png
6. Click Download Report to export the report to Excel.

While uploading content to online courses, please note that files should not exceed 150mb due to limited amount of space within our system. ‎

If files or SCORMS are larger than 150mb, you may need to modify the file so it is a smaller size. 

Videos within online modules are usually the biggest files. Removing these videos within your SCORM and uploading them to the PHSA LearningHub YouTube Channel is an alternative option to decreasing the size of a file.

You should not be uploading any video files directly onto Moodle.

Please submit a ticket if you need to inquire about utilizing YouTube as an alternative option.

‎If you are not using an eLearning software to create your course content, you can create modules on Moodle using activities, specifically, H5P for more interactive features. The H5P content can contain Quizzes, interactive video and presentations.

Like all Moodle activities, please refer to Moodle's helpsite and forums for content creation assistance - Moodle's helpsite and forums on H5P.

To learn about all of the other types of activities that can be created in Moodle, please see the Moodle helpsite*.
*Note not all listed activities on this site are available on LearningHub Moodle.

Please see direct links for commonly used activity types below. :

*If you are using the Articulate Rise eLearning software to create your modules, please ensure to add an “Exit Course” button within your module. 

We have located a helpful video on creating an “Exit Course” button and more information can be found on the Articulate helpsite

Articulate Storyline 3
is one of the many e-learning software available to course managers and instructional designers to create interactive e-Learning content.  

For additional help regarding Articulate Storyline 3, you can view its user guide on their main web page: https://community.articulate.com/series/storyline-3

Please ensure you keep your module source files on your computer as they will be needed for any future updates that you require. LearningHub does not archive your source files.

To create a quiz within Storyline 3:

1.       Open Storyline 3 and select New Project.

1.png

2.       Click New Slide and then Graded Question.

2.png

3.       Select the type of question and the click Insert Slide.3.png

4.       Type out the question and the choices. Check the correct answer.4.png
5.       Set points and feedback for correct and incorrect responses.5.1.png

5.2.png

6.       You can switch to Slide View to see the layout of the question.

6.1.png
 6.2.png

7.       Edit question settings on the top navigation bar.7.png

  1. Shuffle answers: choose to shuffle answers or not
  2. Score: calculated by question or by choice
  3. Attempts for this question: the number of attempts allowed


8.       After all questions have been added, insert a Results slide.8.png

9.       Add the Graded Result Slide.

9.png

10.   Edit Result slide settings.

10.png

11.   To publish the quiz:

  1. Check Player settings on the top navigation bar
    11.1.png11.2.png
  2. Preview the quiz
    11.3.png
  3. If everything looks good, hit Publish -> Publish as LMS
    11.4.png
    Check over the Reporting and Tracking settings and then Publish.
    11.5.png

    11.6.png

    11.7.png

At any point, if you need to change the content of your e-Learning Course, be mindful that any changes can affect learners that are in the process of taking the course module that you are updating. Also note that content that is changed will need to be re-tested.

Learners who have already completed the course or module will not be affected by the changes. 

For Moodle activity modules (e.g. files, Quizzes, etc.), please toggle Edit mode on  and go to "Edit Settings" to follow the steps to edit the activity accordingly.

For file modules, you can upload a new file under "Edit Settings".

editfile4.1.png

Under the file category, either delete the current file (as per below), or drag & drop your new file (file name must be the same) to overwrite the current file. 

updatefile4.1.png

Please review the Activity Completion Settings and Course Completion settings afterwards to ensure the course/module is still completing accordingly. 

For SCORM Activities that were created using e-Learning software (e.g. Articulate, Adobe Captivate, etc.) you will need to make the changes by opening the source file within the software that it was created in. Once the changes have been made within the source file, follow the instructions below to upload the updated SCORM. 

1. Publish and Zip your new file and ensure that it has the same name as the current file already uploaded.

2. Login to the LearningHub

3. Go to Admin Dashboard

4. Go to Courses and locate the course

5. Toggle Edit mode on

editmodeon4.1.png

6. Click the dots next to the activity that needs to be updated and Edit Settings

edit.png

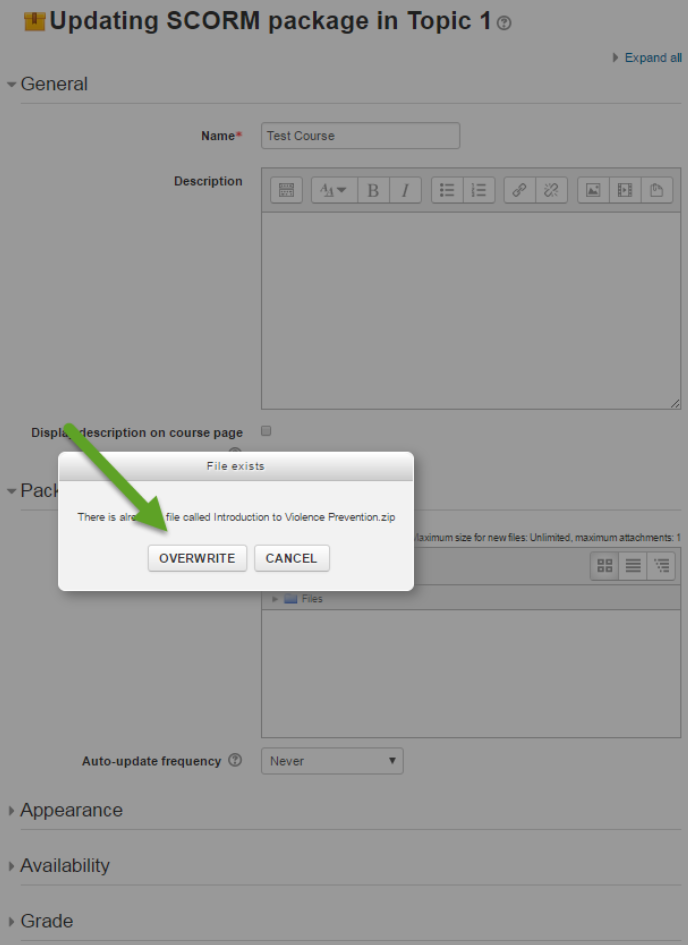
7. Under the Package Section, drag and drop the new zip file into the current file

8. Click Overwrite 

OverwriteEdit.PNG

9. Click Save and Return to Course 

10. Once the module has been updated, please refer to the e-Learning Course Completion Setting Guide to ensure that both the Activity Completion and Course Completion settings are setup properly.

Note* Follow the same procedures for updating other documents like Word, PowerPoint and PDF's